Here is the debut of my new web comic: "The Sucker Hole"
Various thoughts and activities related to my amateur astronomy interests including telescope making and observing. Plus other stuff that may be on my mind.
Tuesday, April 27, 2010
Tuesday, April 20, 2010
Issues with Contrast
I have long known that my 12.5" telescope suffers from contrast issues. I would constantly compare my scope to others and see a noticeable difference. The 16" also suffers from this malady. Contrast issues can be one of two things, overall contrast (i.e., grey background skies) and small contrast (i.e., fine planetary detail). My problem is with overall contrast where the faint wisps of galaxies can be lost in the grey background sky. This type of contrast problem boils down to unwanted light sneaking somehow into the optical path.
I went searching on the net on ways to solve it and I found a post on www.cloudynights.com that discusses how you can identify where that light is coming from. Mike Jones wrote an article in Astronomy Technology today that describes that technique. Essentially, you use a long focal length eyepiece and a another eyepiece stacked on top of it. Mike says in his forum post: "The second eyepiece must have a real focal plane such that you can use it like a loupe, like an orthoscopic, Plossl, etc."
I used a 35mm University Optics Konig and an 18mm University Optics Orthoscopic.
When you look into the top eyepiece, this is the view you get:
As you can see, in my 12.5" scope, the white screws and the pink of the dew heater reflects a lot of light. You would think that it would not be a problem, but it does contribute to the overall brightening of the background sky. Any light scattering is a bad thing! When I did this on my 16", I noticed that there is light reflecting off of the secondary shroud (the piece of metal that holds the secondary in place). It is painted flat black, but there is enough to cause problems. I added some flocking paper to the secondary shroud and part of the spider hub:
This noticeably darkened the view at the eyepiece. I redid the test recently when I was observing at a darker sky and it showed a considerable darkness around the primary mirror. In other words, the primary mirror appears to float in blackness.
For my 12.5", I plan to do something to block the reflected light from the "stuff" above the secondary mirror. I also plan to replace the spider and the secondary sometime soon with a Protostar. But that comes after the 8" is done.
Saturday, April 17, 2010
New Moon Photographed!
France's Thierry Legault has imaged a new moon. It is truly amazing feat!
http://astrosurf.com/legault/new_moon_2010april14.html
I have always wondered if it is possible to take a picture of the new moon and it appears it is. However, the technical challenge of doing so is pretty interesting. Félicitations Thierry!
I have always wondered if it is possible to take a picture of the new moon and it appears it is. However, the technical challenge of doing so is pretty interesting. Félicitations Thierry!
Thursday, April 15, 2010
Grieser Field Observing Report
Electa and I's first night out under dark skies
Some fellow club members and I headed out to Grieser Field to enjoy and evening of deep sky observing. It was new moon, and the weather forecast was calling for clear skies. Jim and I got there first, braving rush hour traffic. Both of us almost got in accidents! Thankfully that did not happen. We arrived well before sunset and set up our telescopes, enjoyed Subway subs, and discussed the evening observing plans. The sky was still soupy from stubborn high Cirrostratus clouds and contrails and were were both worried that they would not clear off. Tim showed up just before sunset.
Jim brought his 12" Teeter. I brought "Electa", my 16" truss dobsonian I just finished. Tim brought a 10" Orion Dobsonian. Tim just purchased a 15" Obsession and Jim and I were giving him a piece of our minds for not bringing it!! We want to look through that thing! Tim has some tweaks to finish on it prior to using it, but he assured us next time, it will be available.
As twilight settled in, we caught brief glimpses of Mercury dodging in and out of the clouds. Venus burned brightly and steadily. The brighter stars started to peak through the soupy muck above us. My heart started to sink. May as well sit back and relax for a bit and hope the sky gets better.
Night arrived and the clouds really started to dissipate away. After some final tweaks to collimation, I started picking off some random objects including M35, M37, M47, M46, The Eskimo Nebula, and more. I brought my sketching materials to rekindle my fondness for sketching deep space objects. I have always wanted to sketch NGC2362, a beautiful open cluster off the tail of Canis Major. Mark Watson, a long time club member, bequeathed the title of "The Porch Light" because it appears like a group of moths are flying around a porch light. Initially, I started sketching using my 13mm Nagler, but I find I don't do well with a large field of view. So I plopped my 12.5mm Orthoscopic eyepiece in. Ahh, much better.
"The Porch Light", NGC2362
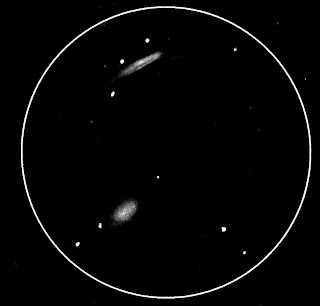
Once I finished NGC2362, I looked up and noticed the sky was getting really clear! I glided the telescope up off the handle of the Big Dipper to have a glimpse of M51. The arms are clearly visible! I stopped by some other familiar targets, NGC4565, M64, M63, and more. I wanted to continue to sketch some more objects so I decided to hop over to NGC4762 and 4754, a nice pair of galaxies off of Vindemiatrix in northern Virgo. Ron Ravneberg really enjoyed this pair and I was introduced to them by Jim not too long ago. They are quickly becoming a favorite pair or mine too.
NGC4762 and 4754
While I was sketching, Jim was calling out cool objects he was looking at. Tim was amazed at M51 in his telescope. Once I finished sketching, Jim gave Tim and I the grand tour of the Virgo Cluster. We would all start at the "Smile" in Virgo, and Jim would then guide us both throughout the cluster. It was a good time. We probably spent half and hour going through everything! It was a hoot. I would use my green laser that is attached to my scope to make sure I was in the right place as Tim and Jim could see the laser in their finders and eyepieces.
The temperature was not too bad and stayed into the 50s for part of the night. Then it quickly started getting colder as the night got clearer. I noticed a tick crawling on my hand. Jim and I took a walk earlier and we pulled off about 12 ticks from our pants. They were hungry! I was picking off "phantom ticks" throughout the night. My mind was playing tricks on me!
I spent most of the middle part of the night going through my observing run. Picking off galaxies in southern Virgo, working my way up towards Spica. I had some detailed charts of 3C273 so I went off and searched for some ancient light. I quickly found it, and shared the view with my observing partners. The light from 3C273 left there around 2.6 billion years ago. Back when the earth was mostly covered in primitive algae generating Oxygen in the primordial atmosphere. Amazing!!
The highpoint of the night for me is when I got to look at the Coma Cluster. We were seeing a lot more galaxies than I have ever seen. We counted 10 galaxies I believe! In the past, I could only detect about 3 or 4. This was turning out to be a good night!!
I continued looking for more galaxies. Jim gave me a chart to search for comet in eastern Virgo. And from there, I did some more galaxy hopping. I got to see Hickson 67 which is a nice compact group of galaxies. I think I may want to start hunting these galaxy groups down.
Next I attempted to sketch M104 in Virgo. It proved to be somewhat of a challenge. I wanted to make sure the dark lane was apparent in my sketch like it was in my scope. Many eraser marks later, I got this:
It was not that bright, so I still need some tweaking done on the sketch, but it sure was fun to draw!
I played around in Leo for a bit before going on to sketch the Siamese Twins in Virgo. I like interacting galaxy pairs and this was a nice one.
NGC4567 and 4568, The Siamese Twins
Along the same lines, another interacting pair is the pair off of Charr in Canes Venetici, NGC 4485 and 4490. This group is a fairly large set of galaxies in my 18mm Ortho and a fine specimen to draw.
I finished the night looking at the early summer sky enjoying old favorites like M27, M57, M17, M8, and M20. Dawn started to tinge the sky and it was time for bed. It was a great night.
Tuesday, April 6, 2010
Planetary Nebulae
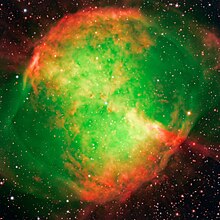
The Dumbbell Nebula - ESO
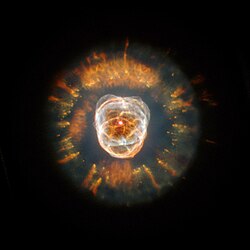
"Will the sun blow up when it dies?" I have been asked that question numerous times during a public program at Perkins Observatory. I inform them that no, the Sun will not blow up at the end of its life, but it will quietly live out it's last days as a planetary nebula. The sun is an average, middle aged star. It has existed now for over 4.5 billion years. It should keep burning for another 5 billion years before it becomes a red giant, when the outer layers of the sun's atmosphere starts to expand and the core starts to heat up and contract. After the red giant phase, the outer parts of the atmosphere will be thrown off due to thermal pulsations leaving a white dwarf at its center. This is the planetary nebula phase that most main sequence stars like our sun spends its retirement.
The Eskimo Nebula - NASA, ESA, Andrew Fruchter (STScI), and the ERO team (STScI + ST-ECF)
The Ring Nebula - The Hubble Heritage Team (AURA/STScI/NASA)
Planetary nebulae are fun to hunt down and enjoy. They represent the last stages of an average star's life and have many different shapes and sizes represented. I hope you enjoy them as much as I do.
Clear Skies
- Photos are public domain images from
Friday, April 2, 2010
Under darker skies...and more refinements
Last night I went to my good friend, and telescope maker, Bill Burton's house to give the scope some time under the stars. Although the seeing was bad, the transparency was good (in between high level clouds). Some objects observed: NGC2903, NGC4565, M81, M82, The Eskimo Nebula, M3, M53, M94, The Black Eye Galaxy, The Sunflower Galaxy, Mars, Venus, Mercury, and Saturn. It is nice to have the extra aperture.
Bill mentioned (and I noticed it too) the scope becomes stiffer at higher altitudes. After talking it over with him, and reading the section on stiction in Dave Kriege's The Dobsonian Telescope , I calculated out what the teflon pad sizes should be.
I weighed the upper assembly (mirror box, trusses, secondary ring, and accessories), and it came to 60 pounds. Divide the weight of the upper assembly by 4 to get the pounds per pad, which came to 15. Dave recommends 15 pounds per square inch for the teflon pads. Divide 15 by 15 and you get 1 square inch which is what I had on the altitude bearings already.
On to azimuth bearing, the total weight of the scope minus the ground board is 105 lbs. Divide that by 3 (because I use 3 pads) and you get 35. Again, using 15 lbs per square inch, divide 35 by 15 and you get 2.33 square inches. Take the square root of that, and that comes out to about 1.5 inches per side for the bottom teflon pads.
I cut out 3 1.5" by 1.5" pads and mounted them to the ground board. The scope moves noticeably smoother at the higher altitudes.
Thanks Bill!
Subscribe to:
Comments (Atom)


